Steps for Creating SDDC Groups
- Mohammed Bilal
- Jul 8, 2022
- 2 min read
You can follow the below steps to create an SDDC group consisting of two SDDCs:
Create an SDDC Group
Link vCenter Server Instances in an SDDC Group
Remove SDDCs from an SDDC Group and Delete an SDDC Group
Create an SDDC Group:
You create an SDDC group.
From the VMware Cloud console browser tab, click SDDCs in the left navigation pane
Click the SDDC Groups tab
Create an SDDC group
Click CREATE SDDC GROUP

In the Name text box, enter SDDC-Group

Click NEXT
Select both SDDCs and click NEXT

Select the Configuring VMware Transit Connect for your group will incur charges per the attachment and data transfers check box and click CREATE GROUP
The SDDC group is created.
Click the SDDC group name
The SDDC group Summary tab opens.
Monitor the status of the SDDCs under the Connectivity Status column and wait for the status to report CONNECTED.

Link vCenter Server Instances in an SDDC Group:
You link all vCenter Server instances in the SDDC group.
From the VMware Cloud console browser tab, click SDDCs
Click the SDDC Groups tab
Click the SDDC group name
The SDDC group Summary tab opens.
Click the vCenter Linking tab
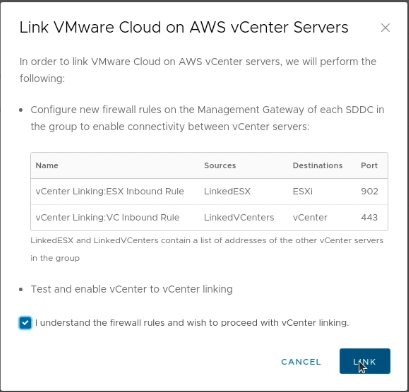
Click LINK ALL vCENTERS

Click the I understand the firewall rules and wish to proceed with the vCenter linking check box
Click LINK

Appropriate firewall rules are automatically created in both SDDCs.
The vCenter linking process takes approximately 2 minutes.
Remove SDDCs from an SDDC Group and Delete an SDDC Group:
You remove SDDCs from the SDDC group and delete the group.
From the VMware Cloud console browser tab, click SDDCs
Click the SDDC Groups tab
Click the SDDC group name
The SDDC group Summary tab opens.
Unlink vCenter Server instances
Click the vCenter Linking tab
Click UNLINK ALL vCENTERS

Select the All vCenter linking will be unlinked and you will no longer manage all vCenter servers collectively check box
Click UNLINK

The unlinking process begins and takes approximately 1 minute.
Remove SDDCs from the SDDC group
Click the Summary tab
Select the check boxes for both SDDCs
Click REMOVE SDDCS

A Removing 2 group members window opens.
Click CONTINUE

The SDDCs are removed from the group. This process takes approximately 5 minutes.
Delete the SDDC group
Click the ACTIONS drop-down menu in the upper-right corner of the SDDC Group Summary tab
Click DELETE GROUP

Select the You will lose all configurations and settings for the SDDC Group check box
Select the All connectivity settings will be deleted check box
Click DELETE GROUP

The SDDC group is deleted.


Comments